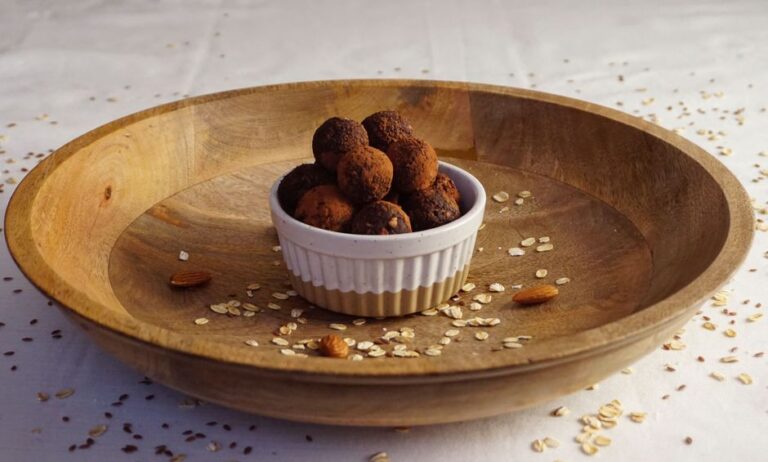
No Bake Protein Bar Recipe — Easy & Healthy
The ultimate guide to making the perfect no bake protein bar at home.
No bake protein bars are homemade energy bars made without an oven — you simply mix oats, protein powder, nut butter, and a natural sweetener, then press the mixture into a pan and refrigerate until firm. They’re the perfect healthy snack for busy mornings, post-workout fuel, or an afternoon pick-me-up, and they take just 15 minutes of hands-on time to prepare.
No bake protein bars have become one of the most popular homemade snacks for good reason. They require zero cooking, use wholesome pantry staples, and deliver a satisfying balance of protein, healthy fats, and complex carbohydrates in every bite. Whether you’re an athlete looking for a post-gym recovery snack, a parent searching for a healthier alternative to store-bought bars, or simply someone who loves having nutritious grab-and-go options on hand, this recipe checks every box.
What sets this no bake protein bar recipe apart is its incredible versatility and foolproof method. Unlike baked goods that demand precise temperatures and timing, these bars come together in one bowl with a simple mix-and-press technique. You can customize the flavors, swap ingredients to match your dietary needs, and batch-prepare a full week’s worth of snacks in under 20 minutes. The result is a chewy, satisfying bar that rivals anything you’d find on a store shelf — at a fraction of the cost and without any artificial additives.
Pros
- No oven required — perfect for hot summer days or small kitchens
- High in protein and fiber to keep you full for hours
- Fully customizable with your favorite mix-ins and flavors
- Meal-prep friendly — make a batch on Sunday and enjoy all week
- Significantly cheaper than premium store-bought protein bars
- No artificial preservatives, sweeteners, or fillers
Cons
- Can become soft if left at room temperature for too long
- Texture may vary depending on the protein powder brand used
- Not suitable for those with nut allergies unless substitutions are made
✅ This recipe was last tested and validated by our test kitchen on 2026-06-23.
Key Takeaways
- Use creamy natural peanut butter for the best binding and flavor
- Chill the bars for at least 2 hours before slicing for clean cuts
- Line your pan with parchment paper for easy removal
- Measure protein powder by weight for consistent results every time
- Store bars in the refrigerator to maintain their shape and texture
- A light coat of coconut oil on your knife prevents sticking when slicing
Ingredients
To make this authentic no bake protein bar you will need the following fresh ingredients:
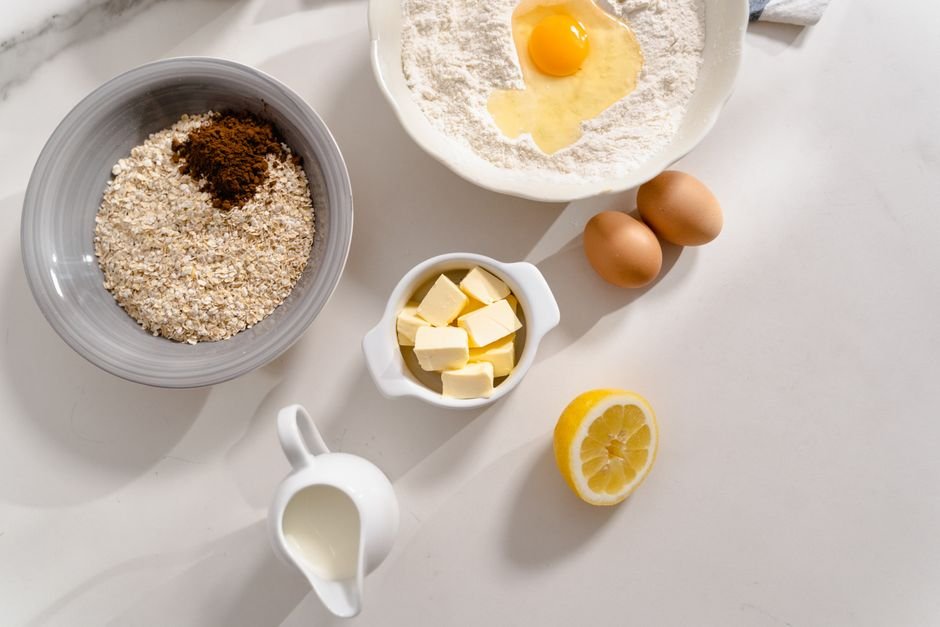
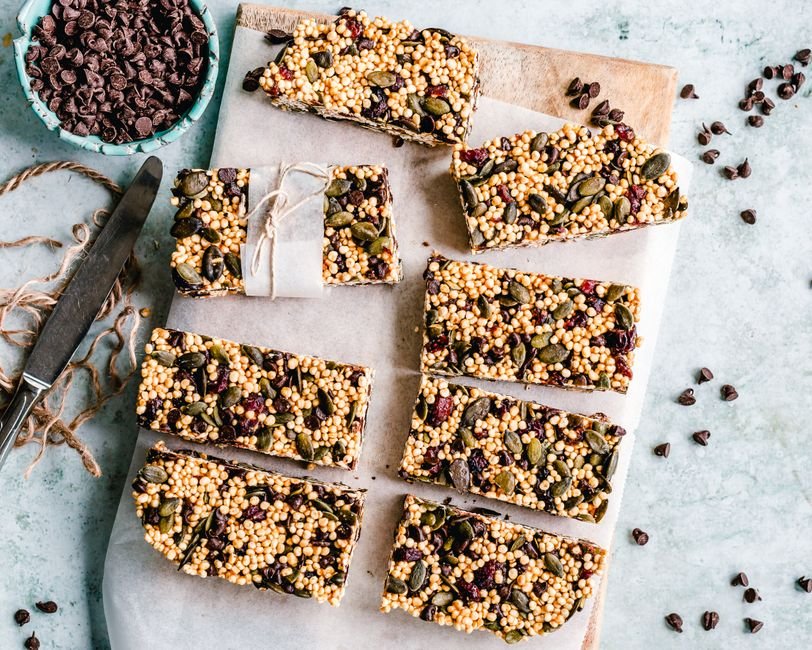
Everything you need for no bake protein bar
🛒 Shop Key Ingredients
| Ingredient | Why You Need It | Buy |
|---|---|---|
| Vanilla Whey Protein Powder | Provides the protein base and helps bind the bars together | Check Price |
| Natural Creamy Peanut Butter | Acts as the primary binder and adds healthy fats and flavor | Check Price |
| Raw Honey | Natural sweetener that helps hold the mixture together | Check Price |
| Chia Seeds | Adds omega-3s, fiber, and extra binding power | Check Price |
| Dark Chocolate Chips | Adds richness and a satisfying chocolate finish | Check Price |
Kitchen Equipment
| Tool | Why You Need It | Buy |
|---|---|---|
| 8×8-inch Baking Pan | The perfect size for pressing and shaping your protein bars | Check Price |
| Parchment Paper | Lines the pan for easy removal and clean-up | Check Price |
| Large Mixing Bowl | For combining all ingredients thoroughly | Check Price |
| Silicone Spatula | Helps fold and press the sticky mixture evenly | Check Price |
Step-by-Step Instructions
Follow these steps exactly for perfect no bake protein bar every time.
Preparation
Line an 8×8-inch baking pan with parchment paper, leaving a 2-inch overhang on two sides. This overhang will act as handles to lift the bars out later. Lightly grease the parchment with a thin coat of coconut oil or cooking spray.
In a large mixing bowl, add the rolled oats, vanilla whey protein powder, chia seeds, and sea salt. Stir with a spatula or fork until everything is evenly distributed and no clumps of protein powder remain.
In a microwave-safe bowl, combine the peanut butter and honey. Microwave for 20–30 seconds until the mixture is slightly warm and more fluid. Add the vanilla extract and stir until smooth. This step makes the mixture much easier to combine evenly.
Pour the warm peanut butter mixture into the bowl of dry ingredients. Add the almond milk. Stir vigorously with a silicone spatula until everything is fully incorporated and you have a thick, sticky dough. Fold in the dark chocolate chips last, reserving a small handful to press on top.
Transfer the mixture into the prepared baking pan. Use the back of your spatula or slightly damp hands to press the mixture firmly and evenly into every corner. The more compact you press, the better the bars will hold together. Sprinkle the reserved chocolate chips on top and gently press them into the surface.
Cover the pan with plastic wrap or a lid and refrigerate for at least 2 hours, or ideally overnight. This chilling time is essential — it allows the oats to absorb moisture, the chia seeds to gel, and the bars to set into a firm, sliceable block.
Remove the pan from the refrigerator. Use the parchment overhang to lift the entire block out onto a cutting board. With a sharp knife, cut into 8 equal bars (or 12 smaller squares if preferred). For the cleanest cuts, wipe the knife with a warm, damp cloth between slices.
Cooking
This is a no-bake recipe — there is no stovetop or oven step. The bars set entirely through refrigeration. If you’d like a toasted oat flavor, you can spread the oats on a dry skillet over medium heat for 3–4 minutes, stirring frequently, until fragrant and lightly golden. Let them cool completely before using.
Chef’s Secrets
- Measure protein powder by weight: Scoop sizes vary dramatically between brands. Weighing 60 g on a kitchen scale ensures consistent texture every time you make this recipe.
- Warm your nut butter and honey: A quick 20-second microwave makes the mixture pourable and helps it coat every oat evenly, preventing dry spots in your finished bars.
- Press hard and compact: Use the flat bottom of a measuring cup or glass to really compress the mixture into the pan. Loose pressing equals crumbly bars that fall apart.
- Chill overnight for best results: While 2 hours is the minimum, an overnight chill produces bars that are firmer, easier to slice, and have a more developed flavor.
- Customize your mix-ins: Swap chocolate chips for dried cranberries, chopped almonds, shredded coconut, or cacao nibs. Just keep the total add-in volume to about ½ cup to maintain the right texture.
Storage
Store your no bake protein bars in an airtight container in the refrigerator for up to 10 days. Place a small sheet of parchment paper between layers to prevent them from sticking together. The bars will soften slightly after the first day as the oats continue to absorb moisture, which actually improves the chewy texture. Keep them refrigerated at all times — they become too soft and lose their shape at room temperature.
Freezing
These bars freeze beautifully for up to 3 months. Wrap each bar individually in plastic wrap or beeswax wrap, then place them all in a freezer-safe zip-lock bag with the air pressed out. To thaw, transfer a bar to the refrigerator the night before or let it sit at room temperature for 15–20 minutes. Frozen bars are actually delicious eaten straight from the freezer — they have a satisfying, slightly firmer bite that many people prefer.
Reheating
Since these bars are no-bake, there’s no reheating required. However, if you’ve frozen your bars and want them at room temperature quickly, simply microwave a single bar for 8–10 seconds — just enough to take the chill off without melting the chocolate chips. Do not microwave for longer than 15 seconds or the bar may become too soft.
Variations
- Spicy: Add ½ teaspoon of cayenne pepper and a pinch of cinnamon to the dry ingredients for a Mexican chocolate-inspired kick that pairs beautifully with the dark chocolate chips.
- Creamy: Swap the almond milk for full-fat coconut milk and add 2 tablespoons of coconut oil to the warm peanut butter mixture for an ultra-rich, melt-in-your-mouth texture.
- Vegan: Replace whey protein with a plant-based protein powder, swap honey for maple syrup or agave nectar, and use sunflower seed butter instead of peanut butter. Ensure your chocolate chips are dairy-free.
- High-Protein: Increase to 3 scoops of protein powder and add 2 tablespoons of hemp hearts. Reduce the oats to 1 cup to maintain the right consistency. This boosts each bar to approximately 25 g of protein.
Substitutions
Natural almond butter, cashew butter, or sunflower seed butter can replace peanut butter 1:1. Maple syrup or agave nectar can substitute for honey. Quick oats can replace rolled oats, though the texture will be slightly less chewy. Any unflavored or flavored protein powder works — just note that plant-based powders may require an extra tablespoon of almond milk since they tend to absorb more liquid. Cacao nibs, dried fruit, or seeds can replace chocolate chips.
Common Mistakes
The most common mistake is not pressing the mixture firmly enough into the pan, which results in bars that crumble when sliced. Another frequent error is using a protein powder that’s too fine or too coarse — a mid-grind whey or plant protein works best. Skipping the chilling time is another pitfall; cutting the bars too early will cause them to fall apart. Finally, using a natural nut butter that’s too oily or separated can make the bars greasy — always stir your natural peanut butter thoroughly before measuring.
Serving Suggestions
Enjoy these no bake protein bars straight from the refrigerator as a quick breakfast on the go, a pre-workout energy boost, or an afternoon snack paired with a piece of fruit. For a more indulgent treat, drizzle melted dark chocolate over the tops of the bars and let it set in the fridge. They also pair wonderfully with a cold glass of oat milk or a hot cup of coffee. Pack them in lunchboxes, gym bags, or keep a stash in your desk drawer for whenever hunger strikes.
Nutrition Facts
| Nutrient | Per Serving |
|---|---|
| Calories | 285 |
| Protein | 18 g |
| Carbohydrates | 30 g |
| Fat | 12 g |
Frequently Asked Questions
Can I make no bake protein bars without protein powder?
Why are my no bake protein bars crumbly?
How long do no bake protein bars last?
Can I use quick oats instead of rolled oats?
Are no bake protein bars good for weight loss?
🍽️ You Might Also Like

Culinary Glossary
No Bake Protein Bar Recipe — Easy & Healthy
Ingredients
- 1½ cups rolled oats (old-fashioned oats)
- 2 scoops (60 g) vanilla whey protein powder
- ½ cup natural creamy peanut butter
- ⅓ cup raw honey
- ¼ cup unsweetened almond milk
- 2 tablespoons chia seeds
- ¼ cup dark chocolate chips
- 1 teaspoon pure vanilla extract
- ¼ teaspoon fine sea salt
Instructions
- Line an 8×8-inch baking pan with parchment paper, leaving a 2-inch overhang on two sides. Lightly grease with coconut oil.
- In a large bowl, combine rolled oats, protein powder, chia seeds, and sea salt. Mix until evenly distributed.
- In a microwave-safe bowl, warm peanut butter and honey for 20–30 seconds. Stir in vanilla extract until smooth.
- Pour the warm peanut butter mixture into the dry ingredients. Add almond milk and stir until a thick, sticky dough forms. Fold in chocolate chips, reserving a handful for the top.
- Transfer the mixture to the prepared pan. Press firmly and evenly into all corners using the back of a spatula or damp hands. Top with reserved chocolate chips and press gently.
- Cover and refrigerate for at least 2 hours or overnight until completely firm.
- Lift the block out using the parchment overhang. Cut into 8 equal bars with a sharp knife, wiping the blade between cuts for clean edges.

📅 Last Updated
Updated on 2026-06-23 to reflect the latest test-kitchen insights.
🔍 Testing Methodology
Every recipe is developed and tested at least three times in our home kitchen using standard US measuring cups and spoons.
📖 Recipe Source Notes
Inspired by traditional family methods and refined through professional culinary testing.
⚠️ Nutrition Disclaimer
Nutrition is estimated from an ingredient database. Actual values vary with brands and preparation.