No Bake Energy Ball Recipe — Quick & Healthy
The ultimate guide to making the perfect no bake energy ball recipe at home.
A no bake energy ball recipe combines rolled oats, nut butter, honey, and mix-ins like chocolate chips and chia seeds into bite-sized snacks — no oven required. Simply mix, roll, and refrigerate for a quick, healthy treat ready in about 15 minutes.
If you are searching for a quick, nutritious snack that requires zero oven time, this no bake energy ball recipe is exactly what you need. These bite-sized power balls are loaded with wholesome oats, creamy peanut butter, natural honey, and nutrient-packed seeds — all rolled into satisfying little spheres that taste like dessert but fuel your day like a proper snack.
What makes this no bake energy ball recipe stand out is its incredible versatility. Whether you need a pre-workout boost, a mid-afternoon pick-me-up, or a lunchbox treat for the kids, these energy balls deliver. They come together in one bowl with no special equipment, and you can customise the mix-ins to match whatever you have in your pantry. Once you master the basic formula, you will never buy expensive store-bought protein balls again.
Pros
- No oven needed — ready in just 15 minutes
- Uses simple, affordable pantry staples
- High in fibre, healthy fats, and natural energy
- Perfect for meal prep — stores well for up to two weeks
- Fully customisable with your favourite mix-ins
- Kid-friendly and great for lunchboxes
Cons
- Can be calorie-dense if portion sizes are not watched
- May crumble if the wet-to-dry ratio is off
- Not suitable for those with nut allergies without substitutions
✅ This recipe was last tested and validated by our test kitchen on 2026-06-12.
Key Takeaways
- Use natural peanut butter for the best binding and flavour.
- Chill the mixture for 10 minutes before rolling to prevent sticking.
- Adjust honey if your peanut butter is already sweetened.
- Store in an airtight container in the fridge for maximum freshness.
- Rotate the balls in your hands gently — do not squeeze too hard.
- Freeze extras on a tray first, then transfer to a bag for easy grab-and-go snacks.
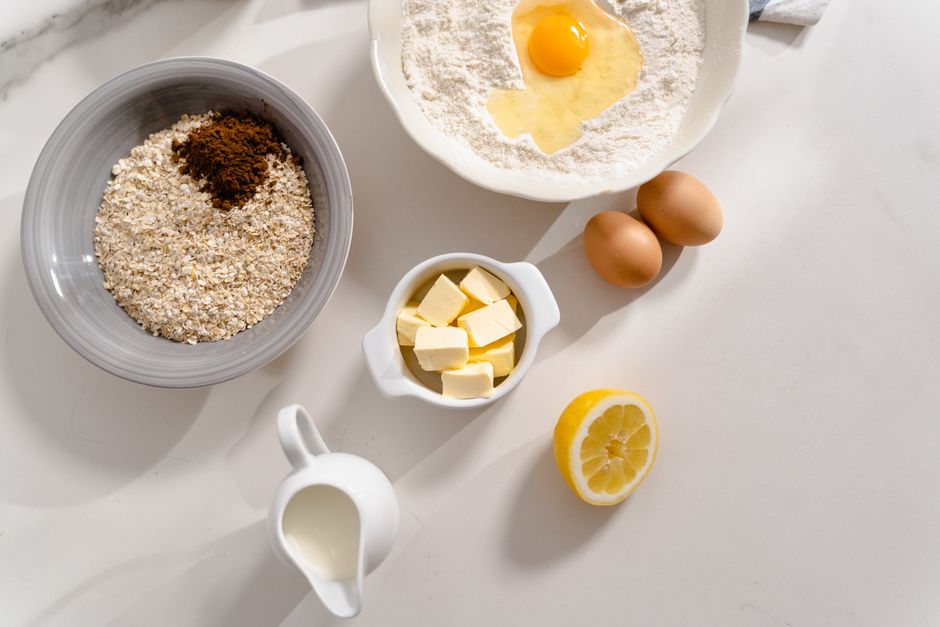
Ingredients
To make this authentic no bake energy ball recipe you will need the following fresh ingredients:
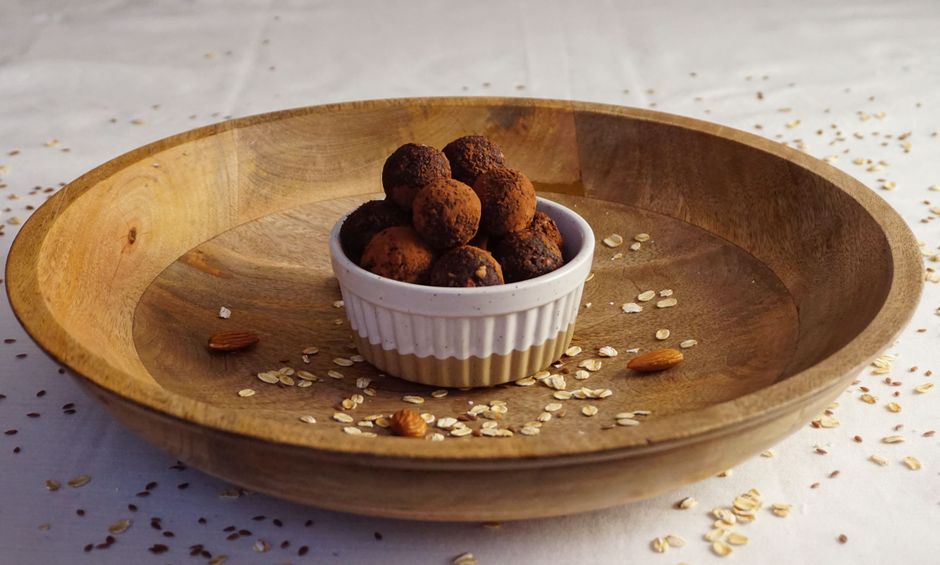
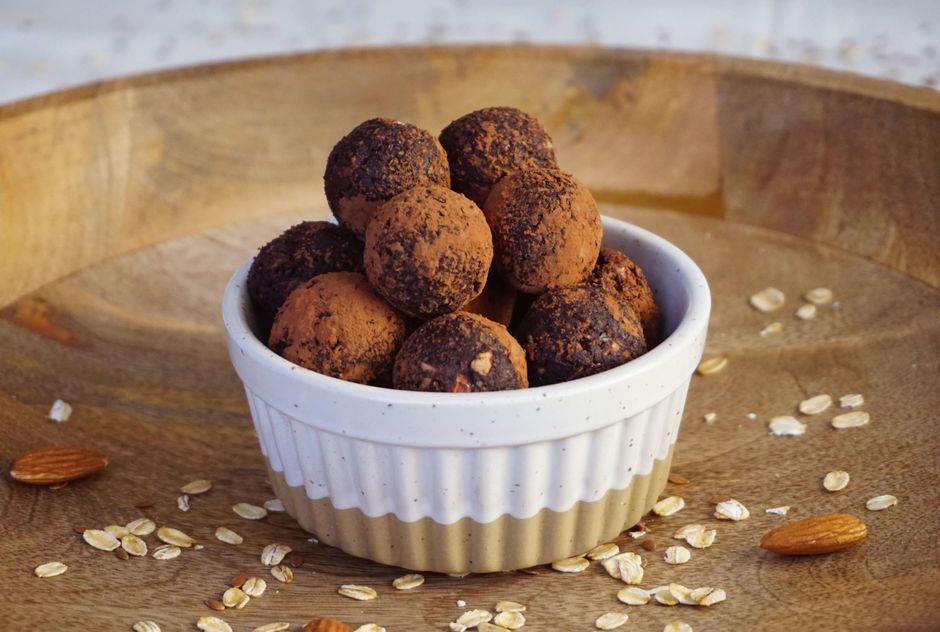
Everything you need for no bake energy ball recipe
🛒 Shop Key Ingredients
| Ingredient | Why You Need It | Buy |
|---|---|---|
| Natural Peanut Butter | Acts as the primary binder and provides protein and healthy fats. | Check Price |
| Rolled Oats | Gives the energy balls their hearty texture and slow-release carbohydrates. | Check Price |
| Raw Honey | Adds natural sweetness and helps bind the dry ingredients together. | Check Price |
| Chia Seeds | Packed with omega-3 fatty acids, fibre, and a subtle crunch. | Check Price |
| Ground Flaxseed | Boosts fibre content and adds a mild nutty flavour. | Check Price |
Kitchen Equipment
| Tool | Why You Need It | Buy |
|---|---|---|
| Large Mixing Bowl | Provides enough space to combine all ingredients evenly. | Check Price |
| Silicone Spatula | Makes it easy to fold and scrape every bit of the sticky mixture. | Check Price |
| Baking Sheet or Tray | Used to set the rolled balls on while they firm up in the fridge. | Check Price |
| Parchment Paper | Prevents the energy balls from sticking to the tray during chilling. | Check Price |
Step-by-Step Instructions
Follow these steps exactly for perfect no bake energy ball recipe every time.
Preparation
In a large mixing bowl, add the rolled oats, chia seeds, ground flaxseed, dark chocolate chips, and sea salt. Stir everything together with a spatula so the ingredients are evenly distributed.
Pour in the natural peanut butter, honey, and vanilla extract. Fold the mixture together until every oat is coated and the dough holds together when squeezed. If it feels too dry, add one extra tablespoon of honey. If too sticky, add a tablespoon more of oats.
Cover the bowl with cling film and refrigerate for 10 minutes. This firms up the peanut butter and honey, making the dough much easier to roll without it sticking to your hands.
Scoop out approximately one tablespoon of dough and roll it between your palms into a smooth ball about the size of a walnut. Repeat until all the dough is used — you should get around 16 balls.
Spread the shredded coconut on a small plate. Gently roll each ball in the coconut until lightly coated on all sides. This adds a pleasant texture and prevents the balls from sticking together in storage.
Place the finished balls on a parchment-lined baking sheet and refrigerate for at least 30 minutes. This final chill firms them up completely and intensifies the flavour as the ingredients meld together.
Serving
Remove the energy balls from the fridge and arrange them on a plate. They can be enjoyed straight from the fridge for a firmer bite or left at room temperature for five minutes for a softer texture.
Chef’s Secrets
- Use drippy peanut butter: Natural, runny peanut butter binds far better than thick, processed brands. If your peanut butter is stiff, microwave it for 15 seconds before mixing.
- Wet your hands while rolling: Lightly dampen your palms with water to prevent the dough from sticking. This trick saves time and keeps each ball perfectly round.
- Toast your oats first: For a deeper, nuttier flavour, spread the oats on a dry pan and toast over medium heat for three to four minutes until fragrant. Cool completely before using.
- Double the batch: This recipe scales beautifully. Make a double batch and freeze half — you will thank yourself on busy mornings when you need a grab-and-go snack.
- Swap the sweetener: Maple syrup or agave nectar work as one-to-one replacements for honey if you prefer a different flavour profile or need a vegan option.
Storage
Store your no bake energy ball recipe in an airtight container in the refrigerator for up to ten days. Place a sheet of parchment paper between layers to prevent them from sticking together. The flavours actually improve after a day or two as the chia seeds absorb moisture and the ingredients meld beautifully.
Freezing
These energy balls freeze exceptionally well. Arrange them in a single layer on a parchment-lined tray and freeze for one hour until solid, then transfer to a zip-lock freezer bag. They will keep for up to three months. Thaw in the refrigerator overnight or let them sit at room temperature for 15 to 20 minutes before eating.
Reheating
Since this is a no-bake recipe, there is no reheating required. However, if you prefer a warm treat, microwave a ball for eight to ten seconds — just enough to slightly soften it and make the chocolate chips gooey. Do not overheat or the structure will break down.
Variations
- Spicy: Add ¼ teaspoon of cayenne pepper and a tablespoon of cacao nibs for a Mexican chocolate-inspired energy ball with a gentle kick of heat.
- Creamy: Swap the peanut butter for almond butter and fold in two tablespoons of coconut cream for an ultra-smooth, melt-in-your-mouth texture.
- Vegan: Replace honey with maple syrup or date syrup and ensure your chocolate chips is dairy-free. Every other ingredient is already plant-based.
- High-Protein: Add two tablespoons of your favourite vanilla or chocolate protein powder and reduce the oats by the same amount to keep the texture balanced.
Substitutions
This no bake energy ball recipe is wonderfully forgiving. Swap peanut butter for almond butter, sunflower seed butter, or tahini if you have nut allergies. Replace rolled oats with quick oats in a pinch, though the texture will be slightly less chewy. Dried cranberries, chopped apricots, or raisins can stand in for chocolate chips. If you do not have chia seeds, use hemp hearts or extra flaxseed instead. Coconut sugar or brown rice syrup can replace honey for a lower-glycaemic option.
Common Mistakes
The most frequent mistake is using the wrong ratio of wet to dry ingredients, which results in balls that either crumble apart or are too sticky to handle. Always start with the base recipe as written and adjust one tablespoon at a time. Another common error is skipping the chilling step — without it, the dough is nearly impossible to roll. Finally, avoid using sweetened or flavoured peanut butter with added oils, as the excess moisture prevents the balls from holding their shape properly.
Serving Suggestions
Serve these energy balls alongside a cold glass of oat milk or a hot cup of green tea for a balanced snack. They work beautifully as part of a brunch spread with fresh fruit and yoghurt, or crumbled over a smoothie bowl for added crunch. For a dessert presentation, drizzle them with melted dark chocolate and a sprinkle of flaky sea salt on a slate board.
Nutrition Facts
| Nutrient | Per Serving |
|---|---|
| Calories | 185 |
| Protein | 6 g |
| Carbohydrates | 20 g |
| Fat | 9 g |
Frequently Asked Questions
How long do no bake energy balls last in the fridge?
Can I make this no bake energy ball recipe without peanut butter?
Why are my energy balls falling apart?
Are no bake energy balls healthy for weight loss?
Can kids help make these energy balls?
Culinary Glossary
No Bake Energy Ball Recipe — Quick & Healthy
Ingredients
- 1 cup rolled oats
- ½ cup natural peanut butter
- ⅓ cup honey
- ¼ cup dark chocolate chips
- 2 tablespoons chia seeds
- 2 tablespoons ground flaxseed
- 1 teaspoon vanilla extract
- Pinch of sea salt
- ¼ cup unsweetened shredded coconut (for rolling)
Instructions
- Combine rolled oats, chia seeds, flaxseed, chocolate chips, and salt in a large bowl.
- Add peanut butter, honey, and vanilla extract. Stir until evenly mixed.
- Chill the mixture in the refrigerator for 10 minutes.
- Scoop one tablespoon of dough and roll into a ball. Repeat to make about 16 balls.
- Roll each ball in shredded coconut to coat.
- Refrigerate for at least 30 minutes before serving.

📅 Last Updated
Updated on 2026-06-12 to reflect the latest test-kitchen insights.
🔍 Testing Methodology
Every recipe is developed and tested at least three times in our home kitchen using standard US measuring cups and spoons.
📖 Recipe Source Notes
Inspired by traditional family methods and refined through professional culinary testing.
⚠️ Nutrition Disclaimer
Nutrition is estimated from an ingredient database. Actual values vary with brands and preparation.