Vegan Chocolate Pudding – Silky, Rich & Easy
The ultimate guide to making the perfect vegan chocolate pudding at home.
Vegan chocolate pudding is a dairy-free dessert made by thickening coconut milk with cornstarch and melting in rich dark chocolate. It sets in the fridge and delivers the same silky, indulgent texture as traditional pudding — without any eggs or dairy. Ready in just 15 minutes of active cooking.
Vegan chocolate pudding is one of those desserts that proves plant-based eating requires zero compromise on flavor or texture. Using full-fat coconut milk as the base creates an incredibly creamy, luxurious mouthfeel, while high-quality dark chocolate delivers that deep, bittersweet cocoa flavor everyone craves. A small amount of cornstarch is all it takes to thicken the mixture into a perfectly set pudding that slices cleanly and melts on the tongue.
Whether you follow a vegan lifestyle, have dairy allergies, or simply want a lighter alternative to traditional pudding, this recipe is a game-changer. It requires only five core ingredients, a single saucepan, and about 15 minutes of hands-on time. The result is a rich, velvety chocolate pudding that rivals any classic version — and it keeps beautifully in the fridge for up to five days, making it an ideal make-ahead dessert for dinner parties, meal prep, or a weeknight treat.
Pros
- Ready in just 15 minutes of active cooking time
- Uses only 5 simple, pantry-friendly ingredients
- Completely dairy-free, egg-free, and plant-based
- Keeps in the refrigerator for up to 5 days
- Easily customizable with different flavors and toppings
- Kid-friendly and perfect for meal prep
Cons
- Coconut milk adds a subtle coconut flavor that not everyone prefers
- Requires at least 2 hours of chilling time to set properly
- Cornstarch-thickened pudding can become grainy if overcooked
- Higher in saturated fat due to coconut milk base
✅ This recipe was last tested and validated by our test kitchen on 2026-06-17.
Key Takeaways
- Use full-fat coconut milk — light versions will not set properly or taste creamy enough.
- Whisk the cornstarch into cold coconut milk before heating to prevent lumps.
- Choose dark chocolate that is 70% cacao or higher for the richest flavor.
- Stir constantly over medium-low heat once the mixture begins to thicken.
- Press plastic wrap directly onto the surface of the pudding while chilling to prevent a skin from forming.
- Allow at least 2 hours of refrigeration for the pudding to fully set before serving.
Ingredients
To make this authentic vegan chocolate pudding you will need the following fresh ingredients:
Everything you need for vegan chocolate pudding
🛒 Shop Key Ingredients
| Ingredient | Why You Need It | Buy |
|---|---|---|
| Full-Fat Coconut Milk | Provides the rich, creamy base that replaces dairy cream. The high fat content is essential for a silky texture. | Check Price |
| Dark Chocolate (70%+) | Delivers deep, complex cocoa flavor and helps the pudding set with its natural cocoa butter content. | Check Price |
| Cornstarch | Acts as the thickening agent that transforms the liquid mixture into a smooth, set pudding without eggs. | Check Price |
| Maple Syrup | Adds natural sweetness with a subtle caramel note that complements the dark chocolate beautifully. | Check Price |
| Unsweetened Cocoa Powder | Intensifies the chocolate flavor and adds a rich, dark color to the finished pudding. | Check Price |
Kitchen Equipment
| Tool | Why You Need It | Buy |
|---|---|---|
| Medium Saucepan | Provides even, gentle heat for melting the chocolate and activating the cornstarch without scorching. | Check Price |
| Whisk | Essential for smoothly incorporating the cornstarch and preventing lumps as the pudding thickens. | Check Price |
| Fine Mesh Strainer | Optional but useful for straining the pudding after cooking to ensure an ultra-smooth, lump-free texture. | Check Price |
| 4 Ramekins or Glass Jars | Individual serving vessels that chill evenly and look beautiful when topped with garnishes. | Check Price |
| Measuring Spoons & Cups | Accurate measurements are critical — too much cornstarch makes the pudding gummy, too little and it won’t set. | Check Price |
Step-by-Step Instructions
Follow these steps exactly for perfect vegan chocolate pudding every time.
Preparation
Open the can of full-fat coconut milk and pour it into a medium saucepan. Add the cornstarch and whisk vigorously until the cornstarch is completely dissolved and no white streaks or lumps remain. This step is critical — adding cornstarch to hot liquid directly will cause clumping.
Sift the unsweetened cocoa powder into the saucepan to avoid lumps. Add the maple syrup and sea salt. Whisk everything together until the mixture is smooth and uniform in color. The mixture will look thin and liquid at this point — that is perfectly normal.
While the saucepan is still off the heat, finely chop the dark chocolate into small, even pieces. Smaller pieces will melt more quickly and evenly when added to the warm mixture. Set aside in a small bowl.
Cooking
Place the saucepan over medium-low heat. Stir continuously with a whisk or silicone spatula. After 3–4 minutes, the mixture will begin to steam and thicken slightly around the edges. Do not increase the heat — gentle, even heat prevents scorching and ensures a smooth texture.
Once the mixture is warm and just starting to bubble at the edges, remove the saucepan from the heat. Add the chopped dark chocolate and let it sit undisturbed for 1 minute to soften. Then whisk gently until the chocolate is completely melted and the pudding is glossy and smooth.
Return the saucepan to medium-low heat. Stir constantly for 2–3 minutes until the pudding thickens to a consistency that coats the back of a spoon. When you draw a line through the pudding on the spoon, it should hold its shape without running back together. Do not let it boil vigorously.
Remove the saucepan from the heat and stir in the vanilla extract. Pour the hot pudding evenly into 4 ramekins or glass jars. Tap each ramekin gently on the counter to release any air bubbles and create a level surface.
Press a small piece of plastic wrap directly onto the surface of each pudding to prevent a skin from forming. Refrigerate for at least 2 hours, or until the pudding is completely set and firm to the touch. For the best texture, chill for 4 hours or overnight.
Chef’s Secrets
- Temper the cornstarch: Always whisk cornstarch into cold or room-temperature liquid before applying heat. Adding it to hot liquid causes instant clumping that no amount of whisking can fix.
- Use the best chocolate you can find: Since chocolate is the star flavor, a high-quality bar with 70–85% cacao makes a dramatic difference compared to standard chocolate chips, which contain stabilizers that affect texture.
- Don’t skip the salt: A small pinch of sea salt amplifies the chocolate flavor and balances the sweetness, making the pudding taste more complex and less one-dimensional.
- Stir, don’t scrape: Use a silicone spatula to stir the pudding as it thickens, scraping the bottom and corners of the pan. This prevents any mixture from overcooking and becoming grainy.
- Plastic wrap trick: Pressing plastic wrap directly onto the surface while chilling prevents the dreaded “pudding skin” — a dry, rubbery layer that forms when air hits the surface.
Storage
Store vegan chocolate pudding in the refrigerator with plastic wrap pressed directly onto the surface of each serving. It will keep fresh for up to 5 days. The pudding will continue to thicken slightly as it sits, so if it becomes too firm, let it sit at room temperature for 10 minutes before serving to soften. Do not leave the pudding at room temperature for more than 2 hours, as the coconut milk base can spoil.
Freezing
This pudding freezes surprisingly well for up to 2 months. Transfer it to an airtight container, leaving a small gap at the top for expansion. Thaw overnight in the refrigerator. The texture may be slightly less silky after freezing, but a quick stir with a fork will restore much of the smoothness. For best results, freeze individual portions so you only thaw what you need.
Reheating
Vegan chocolate pudding is best served cold or at room temperature, but if you prefer a warm, mousse-like consistency, gently reheat individual portions in the microwave in 15-second intervals, stirring between each burst. Alternatively, warm it in a small saucepan over the lowest heat setting, adding a splash of coconut milk if it has thickened too much. Do not boil, as this can break the cornstarch structure and make the pudding watery.
Variations
- Spicy: Add ½ teaspoon of cayenne pepper and a pinch of ground cinnamon to the saucepan along with the cocoa powder. The gentle heat builds slowly and pairs beautifully with dark chocolate.
- Creamy: Blend 1 ripe avocado into the pudding after cooking for an ultra-silky, mousse-like texture with added healthy fats. The chocolate flavor completely masks the avocado taste.
- Vegan: This recipe is already fully vegan. To make it nut-free as well, ensure your dark chocolate and coconut milk are produced in nut-free facilities if allergies are a concern.
- High-Protein: Stir in 2 tablespoons of peanut butter or almond butter after cooking for added protein and a nutty flavor twist. You can also top with hemp seeds or crushed pistachios.
Substitutions
If you don’t have coconut milk, full-fat oat milk or cashew milk can work, though the pudding will be slightly less rich. Replace cornstarch with arrowroot powder in a 1:1 ratio for a grain-free option. Maple syrup can be swapped for agave nectar, coconut sugar (dissolved in a splash of warm water first), or date syrup. For a lower-fat version, use light coconut milk, but note the pudding will be less creamy and may need an extra tablespoon of cornstarch to set properly.
Common Mistakes
The most common mistake is adding cornstarch directly to hot liquid, which creates stubborn lumps that ruin the silky texture. Always dissolve it in cold coconut milk first. Another frequent error is cooking the pudding over too high a heat — this can scorch the bottom and cause the cornstarch to break down, resulting in a thin, watery pudding. Finally, skipping the chilling time is tempting, but the pudding needs at least 2 hours in the fridge for the cornstarch to fully set. Serving it too early will give you chocolate soup rather than pudding.
Serving Suggestions
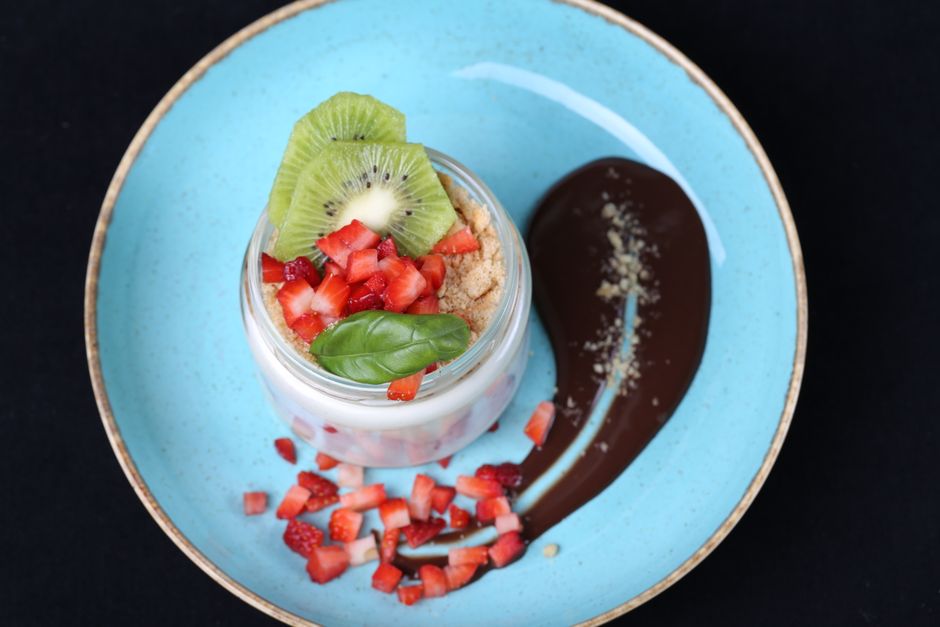
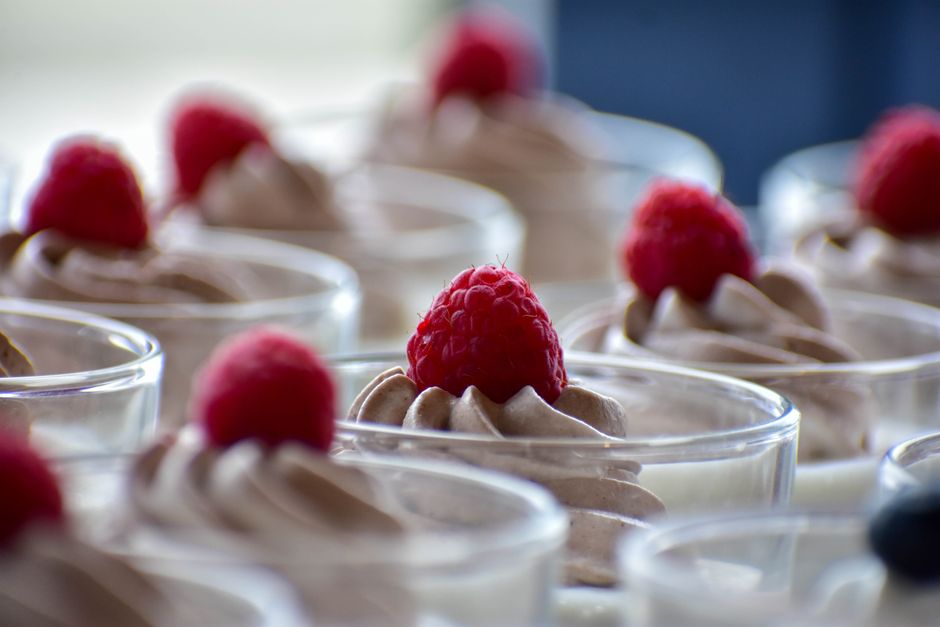
Serve vegan chocolate pudding chilled in individual glass cups or ramekins to showcase its glossy, dark surface. Top with a generous swirl of coconut whipped cream, a handful of fresh raspberries or sliced strawberries, and a light dusting of cocoa powder. For special occasions, add a sprig of fresh mint, a drizzle of melted dark chocolate, or a scattering of cacao nibs for crunch. This pudding also pairs wonderfully with a scoop of vegan vanilla ice cream or alongside a warm vegan brownie for the ultimate dessert plate.
Nutrition Facts
| Nutrient | Per Serving |
|---|---|
| Calories | 285 |
| Protein | 3 g |
| Carbohydrates | 32 g |
| Fat | 17 g |
Frequently Asked Questions
Is this vegan chocolate pudding really dairy-free?
Can I make this pudding without cornstarch?
Why is my pudding not setting?
Can I use cocoa powder instead of dark chocolate?
How do I prevent a skin from forming on the pudding?
Culinary Glossary
Vegan Chocolate Pudding – Silky, Rich & Easy
Ingredients
- 1 can (400 ml) full-fat coconut milk
- 100 g dark chocolate (70% cacao or higher), finely chopped
- 3 tablespoons cornstarch
- 3 tablespoons maple syrup (or agave nectar)
- 2 tablespoons unsweetened cocoa powder
- 1 teaspoon pure vanilla extract
- ¼ teaspoon fine sea salt
- Fresh berries, coconut whipped cream, or cacao nibs for topping (optional)
Instructions
- Pour coconut milk into a saucepan. Add cornstarch and whisk until completely dissolved with no lumps.
- Sift in cocoa powder. Add maple syrup and sea salt. Whisk until smooth.
- Finely chop the dark chocolate and set aside.
- Place saucepan over medium-low heat. Stir continuously for 3–4 minutes until the mixture steams and begins to thicken at the edges.
- Remove from heat. Add chopped chocolate, let sit 1 minute, then whisk until completely melted and glossy.
- Return to medium-low heat. Stir constantly for 2–3 minutes until the pudding coats the back of a spoon and holds a drawn line.
- Remove from heat, stir in vanilla extract. Pour evenly into 4 ramekins or jars. Tap gently to level.
- Press plastic wrap onto the surface of each pudding. Refrigerate for at least 2 hours until fully set.
📅 Last Updated
Updated on 2026-06-17 to reflect the latest test-kitchen insights.
🔍 Testing Methodology
Every recipe is developed and tested at least three times in our home kitchen using standard US measuring cups and spoons.
📖 Recipe Source Notes
Inspired by traditional family methods and refined through professional culinary testing.
⚠️ Nutrition Disclaimer
Nutrition is estimated from an ingredient database. Actual values vary with brands and preparation.