Air Fryer Chicken Thigh: Crispy, Juicy & Easy
The ultimate guide to making the perfect air fryer chicken thigh at home.
Air fryer chicken thighs cook in just 20–25 minutes at 400°F (200°C), delivering crispy skin and juicy meat without deep frying. Season simply with salt, pepper, garlic powder, and paprika for maximum flavor.
Air fryer chicken thighs are a weeknight hero—crispy on the outside, tender and moist inside, and ready in under half an hour. Unlike oven baking, the circulating hot air ensures even browning and locks in natural juices, making this one of the most reliable methods for boneless or bone-in thighs.
This recipe uses pantry staples and requires minimal prep. Whether you’re meal prepping, feeding a family, or craving a protein-packed dinner, these air fryer chicken thighs deliver restaurant-quality results with zero fuss.
Pros
- Cooks in under 30 minutes
- No deep frying—healthier with less oil
- Perfectly crispy skin every time
- Minimal cleanup
- Works with bone-in or boneless thighs
- Great for meal prep and leftovers
Cons
- Smaller batches than oven cooking
- Requires preheating for best results
- Can dry out if overcooked
✅ This recipe was last tested and validated by our test kitchen on 2026-06-15.
Key Takeaways
- Pat thighs dry before seasoning for crispier skin
- Preheat air fryer to 400°F (200°C) for 3–5 minutes
- Don’t overcrowd the basket—cook in batches if needed
- Use a meat thermometer: internal temp should reach 165°F (74°C)
- Let rest 5 minutes before slicing to retain juices
- Flip halfway through cooking for even browning
Ingredients
To make this authentic air fryer chicken thigh you will need the following fresh ingredients:
Everything you need for air fryer chicken thigh
🛒 Shop Key Ingredients
| Ingredient | Why You Need It | Buy |
|---|---|---|
| Smoked Paprika | Adds deep, smoky flavor and vibrant color | Check Price |
| Garlic Powder | Provides savory depth without burning | Check Price |
| Olive Oil | Helps crisp the skin and carry seasonings | Check Price |
Kitchen Equipment
| Tool | Why You Need It | Buy |
|---|---|---|
| Air Fryer (5.8 qt) | Circulates hot air for even crisping | Check Price |
| Meat Thermometer | Ensures safe internal temperature (165°F) | Check Price |
| Mixing Bowl | For tossing chicken with oil and spices | Check Price |
| Tongs | Safely flip hot chicken without piercing skin | Check Price |
Step-by-Step Instructions
Follow these steps exactly for perfect air fryer chicken thigh every time.
Preparation
Pat chicken thighs completely dry with paper towels. Moisture prevents crispiness.
In a bowl, toss thighs with olive oil, garlic powder, paprika, onion powder, thyme, salt, and pepper until evenly coated.
Preheat air fryer to 400°F (200°C) for 3–5 minutes.
Cooking
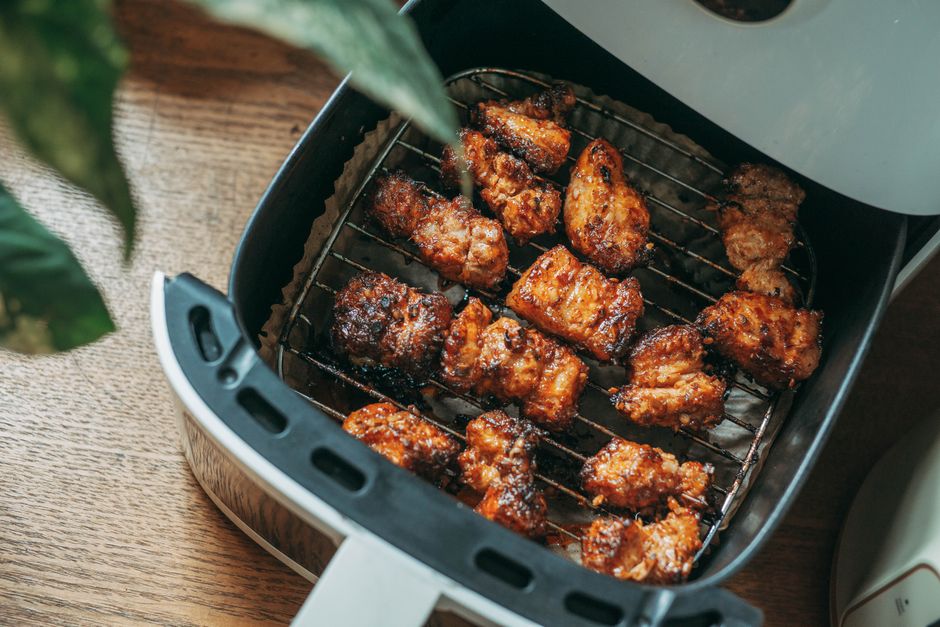
Place thighs skin-side up in a single layer in the air fryer basket. Do not overlap.
Air fry for 18–22 minutes, flipping once at the 10-minute mark, until internal temperature reaches 165°F (74°C).
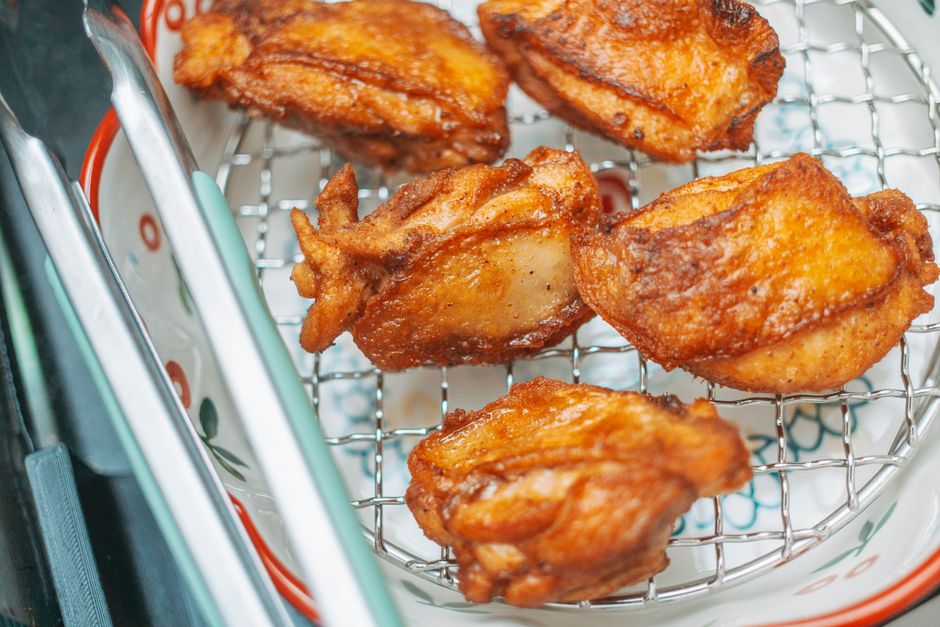
Remove and let rest 5 minutes. Squeeze lemon juice over top and garnish with parsley.
Chef’s Secrets
- Dry skin is key: Always pat thighs thoroughly—wet skin steams instead of crisps.
- Don’t skip preheating: A hot basket sears the skin immediately for better texture.
- Use bone-in, skin-on: These stay juicier and crispier than boneless cuts.
- Check temp early: Thigh size varies—start checking at 18 minutes to avoid drying out.
- Add lemon at the end: Acid brightens flavor without making skin soggy.
Storage
Store cooled air fryer chicken thighs in an airtight container in the refrigerator for up to 4 days. Keep them uncovered for 10 minutes after cooking to prevent condensation from softening the skin.
Freezing
Freeze cooked thighs in a single layer on a baking sheet, then transfer to a freezer bag. They’ll keep for up to 3 months. Thaw overnight in the fridge before reheating.
Reheating
Reheat in the air fryer at 350°F (175°C) for 4–6 minutes to restore crispiness. Avoid microwaving, which makes the skin rubbery.
Variations
- Spicy: Add ½ tsp cayenne pepper and 1 tsp chili flakes to the seasoning mix.
- Creamy: Serve with a drizzle of garlic aioli or herb yogurt sauce.
- Vegan: Substitute with extra-firm tofu or cauliflower steaks; adjust cook time to 15–18 minutes.
- High-Protein: Pair with Greek yogurt dip and roasted chickpeas for added protein.
Substitutions
Use boneless, skinless thighs if preferred—reduce cook time by 3–4 minutes. Swap olive oil for avocado oil (higher smoke point). Replace smoked paprika with sweet paprika or turmeric for color. Lemon can be omitted or substituted with lime.
Common Mistakes
Overcrowding the basket is the most common error—it traps steam and prevents crisping. Skipping the preheat step leads to uneven cooking. Overcooking dries out the meat; always use a thermometer. Finally, adding acidic ingredients like lemon during cooking softens the skin.
Serving Suggestions

Serve air fryer chicken thighs over cilantro-lime rice, alongside roasted Brussels sprouts, or in a grain bowl with avocado and pickled onions. They also shine in tacos or on top of a Caesar salad.
Nutrition Facts
| Nutrient | Per Serving |
|---|---|
| Calories | 320 |
| Protein | 28g |
| Carbohydrates | 2g |
| Fat | 22g |
Frequently Asked Questions
Can I use boneless chicken thighs?
Do I need to flip the chicken?
How do I know when chicken thighs are done?
Can I marinate the chicken first?
Why isn’t my chicken crispy?
Culinary Glossary
Air Fryer Chicken Thigh: Crispy, Juicy & Easy
Ingredients
- 4 bone-in, skin-on chicken thighs (about 1.5 lbs / 680g)
- 2 tbsp olive oil
- 1 tsp garlic powder
- 1 tsp smoked paprika
- ½ tsp onion powder
- ½ tsp dried thyme
- 1 tsp salt
- ½ tsp black pepper
- 1 lemon, juiced (optional)
- Fresh parsley, chopped (for garnish)
Instructions
- Pat chicken thighs completely dry with paper towels.
- Toss with olive oil, garlic powder, paprika, onion powder, thyme, salt, and pepper.
- Preheat air fryer to 400°F (200°C) for 3–5 minutes.
- Place thighs skin-side up in a single layer in the basket.
- Air fry for 18–22 minutes, flipping once at 10 minutes, until internal temp reaches 165°F (74°C).
- Rest 5 minutes, then garnish with lemon juice and parsley.

📅 Last Updated
Updated on 2026-06-15 to reflect the latest test-kitchen insights.
🔍 Testing Methodology
Every recipe is developed and tested at least three times in our home kitchen using standard US measuring cups and spoons.
📖 Recipe Source Notes
Inspired by traditional family methods and refined through professional culinary testing.
⚠️ Nutrition Disclaimer
Nutrition is estimated from an ingredient database. Actual values vary with brands and preparation.