Gluten Free Waffle Recipe — Crispy, Fluffy & Easy
The ultimate guide to making the perfect gluten free waffle recipe at home.
This gluten free waffle recipe uses a simple blend of gluten free all-purpose flour, eggs, and buttermilk to produce waffles that are crispy on the outside and light and fluffy on the inside. The batter comes together in under 10 minutes and cooks in about 4 minutes per waffle — no special skills required.
Finding a truly great gluten free waffle recipe can feel like searching for a needle in a haystack. Too many recipes produce waffles that are dense, gummy, or crumble apart the moment you lift them from the iron. This recipe solves all of those problems with a carefully balanced blend of gluten free flour, a touch of cornstarch for structure, and buttermilk for tenderness and a subtle tang that makes these waffles taste just as good — if not better — than their traditional counterparts.
Whether you’re cooking for someone with celiac disease, a gluten sensitivity, or you simply want a lighter breakfast option, this gluten free waffle recipe delivers every time. The secret lies in the combination of xanthan gum (already included in most quality GF flour blends), a rest period for the batter, and the right amount of fat to create that irresistible golden crust. Follow the steps below and you’ll have a batch of restaurant-quality waffles ready in under 30 minutes.
Pros
- Crispy exterior with a light, fluffy interior — no gumminess
- Uses a standard gluten free all-purpose flour blend — no hard-to-find ingredients
- Batter rests for 10 minutes, improving texture significantly
- Freezes and reheats beautifully for meal prep
- Easily adaptable to dairy-free or vegan diets
- Kid-approved and family-friendly
Cons
- Requires a waffle iron — no oven-only workaround
- Gluten free flour blends vary; results depend on brand choice
- Slightly more expensive than regular wheat-based waffles
✅ This recipe was last tested and validated by our test kitchen on 2026-06-17.
Key Takeaways
- Use a quality GF flour blend that already contains xanthan gum (such as Bob’s Red Mill 1-to-1 or King Arthur Measure for Measure)
- Let the batter rest for 10 minutes before cooking — this hydrates the flour and improves texture
- Don’t open the waffle iron too early; wait for the steam to stop for maximum crispiness
- Brush the iron with melted butter or oil between every waffle for a golden crust
- Place cooked waffles on a wire rack in a 200 °F oven to keep them crispy while you finish the batch
- Freeze extras in a single layer before bagging — they reheat in the toaster in 3 minutes
Ingredients
To make this authentic gluten free waffle recipe you will need the following fresh ingredients:

Everything you need for gluten free waffle recipe
🛒 Shop Key Ingredients
| Ingredient | Why You Need It | Buy |
|---|---|---|
| Gluten Free All-Purpose Flour Blend | The base of the batter — choose a blend with xanthan gum for structure and elasticity. | Check Price |
| Cornstarch | Adds crispiness and lightness to the waffle’s interior. | Check Price |
| Buttermilk | Provides tang, tenderness, and activates the baking soda for lift. | Check Price |
| Pure Vanilla Extract | Enhances the overall flavor and adds warmth. | Check Price |
Kitchen Equipment
| Tool | Why You Need It | Buy |
|---|---|---|
| Waffle Iron | Essential for cooking the waffles to a golden, crispy finish. A Belgian-style iron gives the deepest pockets. | Check Price |
| Mixing Bowls (2) | One for dry ingredients, one for wet — combining separately ensures even distribution. | Check Price |
| Whisk | For smoothly combining the batter without overmixing. | Check Price |
| Wire Cooling Rack | Keeps cooked waffles crispy by allowing air to circulate underneath. | Check Price |
Step-by-Step Instructions
Follow these steps exactly for perfect gluten free waffle recipe every time.
Preparation
In a large mixing bowl, whisk together the gluten free flour blend, cornstarch, baking powder, baking soda, salt, and sugar until evenly combined. Break up any lumps in the flour with the back of the whisk.
In a separate medium bowl, whisk the eggs until lightly beaten. Add the buttermilk, melted butter, and vanilla extract. Whisk until smooth and uniform.
Pour the wet ingredients into the dry ingredients. Gently fold with a spatula or whisk until just combined — a few small lumps are perfectly fine. Overmixing will make the waffles tough.
Cover the bowl and let the batter rest at room temperature for 10 minutes. This allows the gluten free flour to fully hydrate and the baking powder to begin activating, resulting in lighter, fluffier waffles.
Cooking
Plug in your waffle iron and set it to medium-high heat (approximately 375 °F / 190 °C if your model has a temperature dial). Allow it to fully preheat — most irons have an indicator light that turns off when ready.
Lightly brush or spray both the top and bottom plates of the waffle iron with cooking spray or melted butter. This is essential for achieving a crispy, golden exterior and easy release.
Pour approximately ¾ cup of batter onto the center of the lower plate (adjust based on your iron’s size). Close the lid gently — do not press down hard. Cook for 4–5 minutes, or until the waffle is deep golden brown and steam has mostly stopped escaping from the sides.
Carefully lift the waffle out using a fork or silicone tongs. Place on a wire cooling rack set over a baking sheet in a 200 °F oven to stay warm and crispy. Re-grease the iron and repeat with the remaining batter until all waffles are cooked.
Chef’s Secrets
- Room-temperature eggs: Cold eggs can cause the melted butter to seize and create a lumpy batter. Take your eggs out of the fridge 20 minutes before starting.
- Don’t peek: Resist the urge to open the waffle iron during cooking. Every time you lift the lid, you release steam and heat, which leads to pale, undercooked waffles.
- Butter over oil: Brushing the iron with melted butter instead of using cooking spray gives a richer flavor and a more even golden color.
- The oven trick: Placing finished waffles on a wire rack in a low oven (200 °F) keeps them hot and crispy for up to 20 minutes — far better than stacking them on a plate, which traps steam and makes them soggy.
- Measure flour correctly: Spoon the gluten free flour into your measuring cup and level it off with a knife. Scooping directly from the bag compacts the flour and can add up to 30% more than needed, resulting in dense waffles.
Storage
Allow leftover waffles to cool completely on a wire rack before storing. Place them in a single layer inside a zip-lock freezer bag or airtight container, separating layers with parchment paper to prevent sticking. Store in the refrigerator for up to 3 days. Do not leave cooked waffles at room temperature for more than 2 hours.
Freezing
These gluten free waffles freeze exceptionally well. Lay cooled waffles in a single layer on a parchment-lined baking sheet and freeze for 1–2 hours until solid (this prevents them from sticking together). Transfer the frozen waffles to a zip-lock freezer bag, press out excess air, and label with the date. They will keep for up to 3 months. No need to thaw before reheating.
Reheating
For the crispiest results, reheat frozen waffles directly in a toaster or toaster oven on a medium setting for 2–3 minutes. Alternatively, place them on a wire rack in a 350 °F oven for 5–7 minutes. Avoid the microwave — it will make them soft and chewy rather than crispy.
Variations
- Spicy: Add ½ teaspoon of cayenne pepper and 1 teaspoon of smoked paprika to the dry ingredients for a smoky, slightly spicy kick that pairs beautifully with fried chicken.
- Creamy: Fold ½ cup of ricotta cheese into the batter for ultra-moist, rich waffles with a tender crumb. Reduce the buttermilk by ¼ cup to maintain the right consistency.
- Vegan: Replace the eggs with 2 flax eggs (2 tablespoons ground flaxseed mixed with 6 tablespoons warm water, rested 5 minutes), use plant-based milk with 1 tablespoon of lemon juice as a buttermilk substitute, and swap the butter for melted coconut oil.
- High-Protein: Add 2 scoops of unflavored or vanilla protein powder to the dry ingredients and increase the buttermilk by ¼ cup to compensate for the extra dry volume.
Substitutions
If you don’t have buttermilk, make a quick substitute by adding 1 tablespoon of white vinegar or lemon juice to 1¾ cups of regular milk and letting it sit for 5 minutes until it curdles. For a dairy-free version, use oat milk or almond milk with the same amount of acid. The melted butter can be replaced with coconut oil or a neutral-flavored oil like avocado oil. If your gluten free flour blend does not contain xanthan gum, add ½ teaspoon to the dry ingredients — this is critical for binding and preventing crumbly waffles.
Common Mistakes
The most common mistake when making gluten free waffles is overmixing the batter, which develops a gummy, dense texture. Mix until just combined and leave the lumps. Another frequent error is skipping the batter rest — gluten free flours need extra time to hydrate fully. Using too much batter is also a problem; overfilling the iron causes overflow and uneven cooking. Finally, avoid stacking hot waffles directly on top of each other, as the trapped steam will make them soggy within minutes.
Serving Suggestions

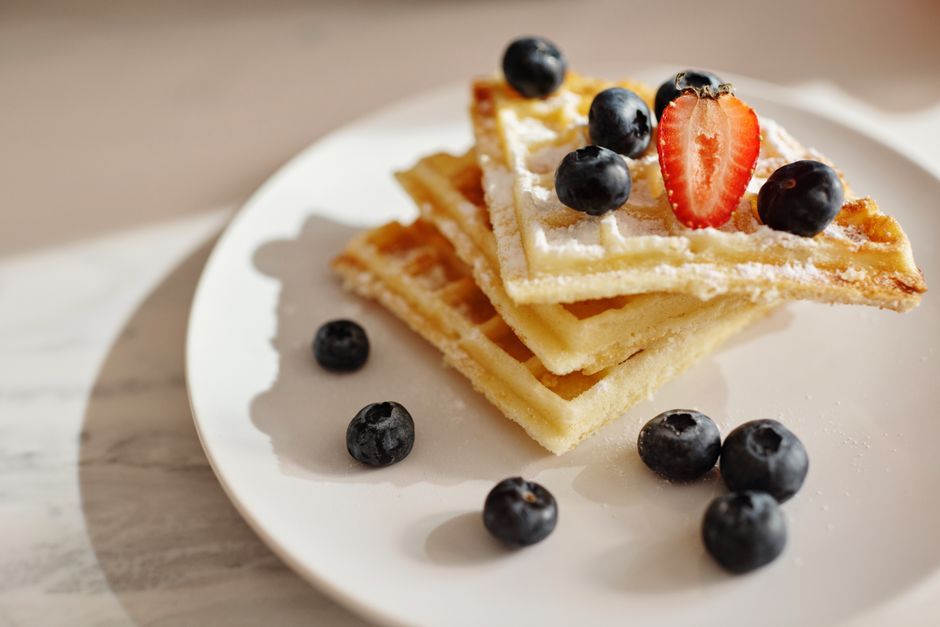
Serve these gluten free waffles hot off the iron with a pat of butter slowly melting on top and a generous drizzle of pure maple syrup. For a more elaborate brunch presentation, top with fresh berries, a dollop of whipped cream, and a dusting of powdered sugar. They also make an incredible base for chicken and waffles — pair with crispy fried chicken thighs and a drizzle of hot honey. For a savory twist, top with a fried egg, avocado slices, and a sprinkle of everything bagel seasoning.
Nutrition Facts
| Nutrient | Per Serving |
|---|---|
| Calories | 310 |
| Protein | 7 g |
| Carbohydrates | 42 g |
| Fat | 12 g |
Frequently Asked Questions
Can I use any gluten free flour blend for this waffle recipe?
Why are my gluten free waffles gummy inside?
Can I make the batter the night before?
How do I keep waffles crispy while cooking a full batch?
Are these waffles suitable for people with celiac disease?
Culinary Glossary
Gluten Free Waffle Recipe — Crispy, Fluffy & Easy
Ingredients
- 2 cups gluten free all-purpose flour blend (with xanthan gum)
- 2 tablespoons cornstarch
- 1 tablespoon baking powder
- ½ teaspoon baking soda
- ½ teaspoon salt
- 2 tablespoons granulated sugar
- 2 large eggs
- 1¾ cups buttermilk
- ⅓ cup melted unsalted butter, slightly cooled
- 2 teaspoons pure vanilla extract
- Cooking spray or extra butter for the waffle iron
Instructions
- Whisk together the gluten free flour, cornstarch, baking powder, baking soda, salt, and sugar in a large bowl.
- In a separate bowl, whisk the eggs, buttermilk, melted butter, and vanilla until smooth.
- Pour the wet ingredients into the dry and fold gently until just combined. A few lumps are fine.
- Cover and let the batter rest for 10 minutes at room temperature.
- Preheat the waffle iron to medium-high heat (approximately 375 °F).
- Lightly grease the iron with cooking spray or melted butter.
- Pour about ¾ cup of batter onto the center of the lower plate. Close the lid and cook for 4–5 minutes until deep golden brown and steam has stopped.
- Remove the waffle carefully and place on a wire rack in a 200 °F oven to stay warm. Re-grease the iron and repeat with remaining batter.
- Serve immediately with your favorite toppings.

📅 Last Updated
Updated on 2026-06-17 to reflect the latest test-kitchen insights.
🔍 Testing Methodology
Every recipe is developed and tested at least three times in our home kitchen using standard US measuring cups and spoons.
📖 Recipe Source Notes
Inspired by traditional family methods and refined through professional culinary testing.
⚠️ Nutrition Disclaimer
Nutrition is estimated from an ingredient database. Actual values vary with brands and preparation.