Honey Garlic Chicken Thigh — Sticky, Crispy & Perfect
The ultimate guide to making the perfect honey garlic chicken thigh at home.
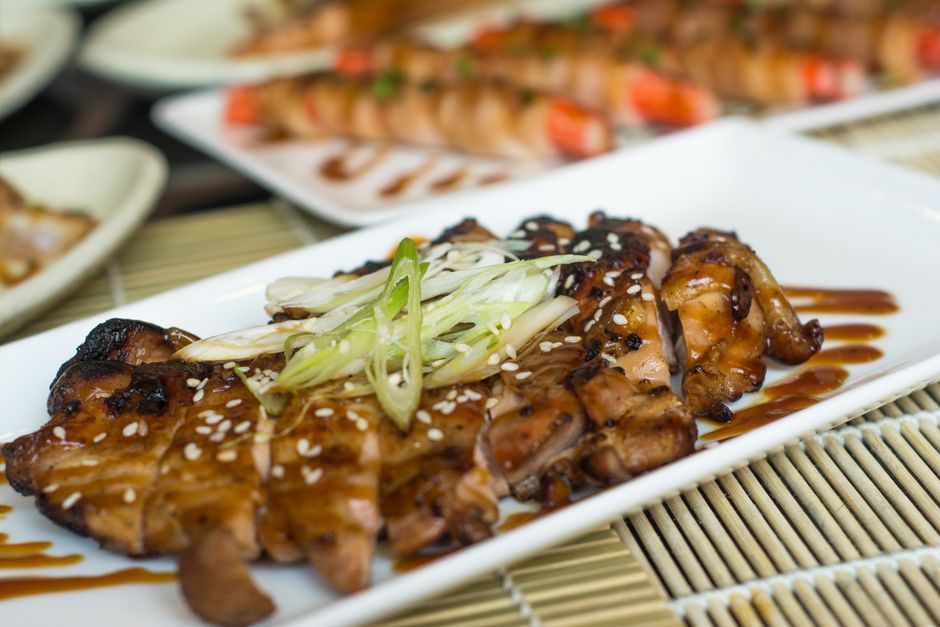
Honey garlic chicken thigh is a one-pan weeknight dinner featuring bone-in, skin-on chicken thighs seared until crispy, then coated in a sticky-sweet glaze made from honey, soy sauce, garlic, and rice vinegar. The whole dish comes together in about 40 minutes and delivers restaurant-quality flavor with minimal effort.
There’s a reason honey garlic chicken thigh has become one of the most-searched dinner recipes online. It hits every craving at once — the deep umami of soy sauce, the floral sweetness of real honey, the sharp bite of fresh garlic, and the irresistible crunch of perfectly seared chicken skin. Unlike breast meat, thighs stay juicy and forgiving, making this the ideal recipe for busy weeknights when you want something impressive without the stress.
This recipe walks you through every step, from choosing the right cut to nailing the glaze consistency so it clings to every crevice of the chicken. Whether you’re a beginner or a seasoned home cook, you’ll find pro tips, substitution ideas, and storage guidance that make this your new go-to chicken dinner. Let’s get cooking.
Pros
- Ready in just 40 minutes from start to finish
- Uses pantry staples you likely already have
- Bone-in thighs stay incredibly juicy and flavorful
- One-pan recipe means minimal cleanup
- Kid-friendly and crowd-pleasing flavor profile
- Easy to scale up for meal prep or dinner parties
Cons
- Higher in sugar due to the honey glaze
- Bone-in thighs take slightly longer than boneless
- Skin can lose crispiness if oven temperature is too low
- Not suitable for strict low-sodium diets without modification
✅ This recipe was last tested and validated by our test kitchen on 2026-06-18.
Key Takeaways
- Pat chicken thighs completely dry before seasoning — moisture is the enemy of crispy skin
- Use a cast-iron skillet for the best sear and even heat distribution
- Add garlic in the last 30 seconds of cooking to prevent burning and bitterness
- Let the glaze reduce until it coats the back of a spoon for the perfect sticky consistency
- Rest the chicken for 5 minutes after cooking so the juices redistribute
- Double the glaze if you love extra sauce for drizzling over rice
Ingredients
To make this authentic honey garlic chicken thigh you will need the following fresh ingredients:
Everything you need for honey garlic chicken thigh
🛒 Shop Key Ingredients
| Ingredient | Why You Need It | Buy |
|---|---|---|
| Raw Honey | Provides natural sweetness and creates the signature sticky glaze that clings to the chicken. | Check Price |
| Low-Sodium Soy Sauce | Adds deep umami and saltiness while keeping sodium levels in check. | Check Price |
| Rice Vinegar | Balances the sweetness of honey with a subtle tang and brightens the entire glaze. | Check Price |
| Sesame Oil | Adds a nutty, toasty aroma that rounds out the Asian-inspired flavor profile. | Check Price |
| Fresh Ginger | Provides warm, peppery depth that complements the garlic and honey beautifully. | Check Price |
Kitchen Equipment
| Tool | Why You Need It | Buy |
|---|---|---|
| Cast-Iron Skillet (12-inch) | Retains high, even heat for the crispiest chicken skin and best sear. | Check Price |
| Instant-Read Thermometer | Ensures chicken reaches the safe internal temperature of 165 °F (74 °C). | Check Price |
| Small Saucepan | Used to reduce and thicken the honey garlic glaze to the perfect consistency. | Check Price |
| Tongs | Allows you to flip chicken thighs safely without piercing the skin and losing juices. | Check Price |
| Microplane Grater | Makes quick work of grating fresh ginger and mincing garlic to a fine paste. | Check Price |
Step-by-Step Instructions
Follow these steps exactly for perfect honey garlic chicken thigh every time.
Preparation
Remove chicken thighs from the packaging and pat them completely dry with paper towels on both sides. This is the single most important step for achieving crispy skin — any surface moisture will steam the skin instead of searing it.
Season both sides of each thigh generously with salt and black pepper. Let them sit at room temperature for 10 minutes while you prepare the glaze. This brief rest allows the seasoning to penetrate the meat.
In a small bowl, whisk together the honey, soy sauce, rice vinegar, sesame oil, grated ginger, and minced garlic until fully combined. Set aside. In a separate tiny bowl, mix the cornstarch with 2 tablespoons of water to create a slurry — this will thicken the glaze later.
Cooking
Heat olive oil in a large cast-iron skillet over medium-high heat until the oil shimmers. Place the chicken thighs skin-side down and cook without moving them for 6–7 minutes, until the skin is deep golden brown and releases easily from the pan.
Flip the thighs using tongs and cook for another 5 minutes on the flesh side. The internal temperature should be approaching 150 °F (65 °C) at this point.
Pour the honey garlic glaze directly into the skillet around the chicken. Reduce heat to medium-low. Let the sauce simmer and bubble for 3–4 minutes, spooning it over the chicken occasionally.
Give the cornstarch slurry a stir and drizzle it into the simmering glaze. Stir gently for 1–2 minutes until the sauce thickens enough to coat the back of a spoon. The glaze should look glossy and sticky.
Flip the thighs one final time so the skin side is up and generously spoon glaze over the top. Cook for 1 more minute. Remove from heat and let the chicken rest in the skillet for 5 minutes. The internal temperature should reach 165 °F (74 °C).
Transfer the chicken to a serving platter. Drizzle any remaining glaze from the skillet over the top. Sprinkle with toasted sesame seeds and sliced green onions. Add a pinch of red pepper flakes if you like a little heat.
Chef’s Secrets
- Don’t move the chicken: Once you place the thighs skin-side down, resist the urge to peek or shift them. Let the Maillard reaction do its work for a full 6–7 minutes for the crispiest, most flavorful crust.
- Use raw, unprocessed honey: Raw honey has a more complex floral flavor and a thinner consistency that blends into the glaze more smoothly than processed honey.
- Control the garlic timing: If you prefer a milder garlic flavor, add the minced garlic to the glaze before it goes into the pan. For a sharper bite, sprinkle it in during the last minute of cooking.
- Double the glaze for rice lovers: If you’re serving this over steamed jasmine rice, make 1.5× the glaze recipe so there’s plenty of extra sauce to drizzle over everything.
- Finish under the broiler: For an extra-crispy, caramelized top, transfer the glazed chicken to a sheet pan and broil on high for 2–3 minutes at the very end. Watch carefully to avoid burning the honey.
Storage
Allow the cooked honey garlic chicken thighs to cool to room temperature, then transfer them to an airtight container. Spoon any remaining glaze over the top to keep the meat moist. Store in the refrigerator for up to 4 days. The flavors actually deepen overnight, making leftovers even more delicious the next day.
Freezing
Place cooled chicken thighs in a single layer on a parchment-lined baking sheet and freeze for 2 hours until solid. Transfer the frozen thighs to a freezer-safe zip-lock bag, pressing out as much air as possible. Label with the date and freeze for up to 3 months. The glaze may change texture slightly upon freezing but will reconstitute beautifully when reheated.
Reheating
For the best results, reheat refrigerated honey garlic chicken thighs in a skillet over medium-low heat with a splash of water or extra soy sauce to refresh the glaze. Cover with a lid and cook for 5–7 minutes until the internal temperature reaches 165 °F (74 °C). You can also reheat in a 350 °F (175 °C) oven for 10–12 minutes. Avoid the microwave if possible, as it can make the skin rubbery.
Variations
- Spicy: Add 1–2 tablespoons of gochujang (Korean chili paste) or sriracha to the glaze for a sweet-heat version that packs serious flavor.
- Creamy: Stir 2 tablespoons of heavy cream or coconut milk into the finished glaze for a rich, velvety sauce that pairs beautifully with mashed potatoes.
- Vegan: Replace chicken with extra-firm tofu slabs or cauliflower steaks. Use maple syrup instead of honey and follow the same glaze and cooking method.
- High-Protein: Serve alongside a side of edamame and a soft-boiled egg over rice to push the protein content past 40 grams per serving.
Substitutions
If you don’t have rice vinegar, apple cider vinegar or white wine vinegar work well as a 1:1 swap. Coconut aminos can replace soy sauce for a soy-free, slightly sweeter alternative. Maple syrup or agave nectar can stand in for honey if needed. For the cornstarch slurry, arrowroot powder or potato starch will thicken the glaze just as effectively. Boneless, skinless thighs can be used — reduce the searing time to 4 minutes per side and expect a slightly less crispy result.
Common Mistakes
The most common mistake is overcrowding the pan, which drops the temperature and steams the chicken instead of searing it. Cook in batches if your skillet isn’t large enough. Another frequent error is adding the glaze too early — the sugars in honey burn quickly over high heat, so always reduce the temperature before pouring in the sauce. Finally, skipping the cornstarch slurry results in a thin, watery glaze that slides right off the chicken instead of clinging to it.
Serving Suggestions
Honey garlic chicken thigh is classically served over a bed of steamed jasmine or basmati rice to soak up every drop of the glossy glaze. For a complete meal, add a side of steamed broccoli, roasted bok choy, or a quick cucumber sesame salad. It also pairs wonderfully with garlic butter noodles, cauliflower rice for a low-carb option, or tucked into a warm tortilla with shredded cabbage for Asian-inspired tacos. A cold Asian pear or a simple green tea makes the perfect beverage pairing.
Nutrition Facts
| Nutrient | Per Serving |
|---|---|
| Calories | 420 cal |
| Protein | 32 g |
| Carbohydrates | 28 g |
| Fat | 20 g |
Frequently Asked Questions
Can I use boneless chicken thighs instead of bone-in?
How do I prevent the honey glaze from burning?
Is this recipe gluten-free?
Can I bake the chicken instead of pan-searing it?
What’s the best way to get extra-crispy chicken skin?
🍽️ You Might Also Like


Culinary Glossary
Honey Garlic Chicken Thigh — Sticky, Crispy & Perfect
Ingredients
- 4 bone-in, skin-on chicken thighs (about 2 lbs / 900 g)
- ⅓ cup (80 ml) raw honey
- ¼ cup (60 ml) low-sodium soy sauce
- 6 cloves garlic, minced
- 2 tablespoons rice vinegar
- 1 tablespoon sesame oil
- 1 tablespoon fresh ginger, grated
- 1 tablespoon cornstarch mixed with 2 tablespoons water
- 1 tablespoon olive oil or vegetable oil
- ½ teaspoon black pepper
- ½ teaspoon salt
- 1 tablespoon sesame seeds, for garnish
- 2 green onions, thinly sliced, for garnish
- Pinch of red pepper flakes (optional)
Instructions
- Pat chicken thighs completely dry with paper towels on both sides.
- Season both sides with salt and black pepper. Rest at room temperature for 10 minutes.
- Whisk together honey, soy sauce, rice vinegar, sesame oil, ginger, and garlic in a bowl. Prepare cornstarch slurry separately.
- Heat olive oil in a cast-iron skillet over medium-high heat. Place thighs skin-side down and sear for 6–7 minutes without moving.
- Flip thighs and cook for 5 minutes on the flesh side.
- Pour the honey garlic glaze into the skillet around the chicken. Reduce heat to medium-low and simmer for 3–4 minutes, spooning glaze over the chicken.
- Add cornstarch slurry to the glaze and stir for 1–2 minutes until the sauce thickens and coats the back of a spoon.
- Flip thighs skin-side up, spoon glaze over the top, and cook 1 more minute. Remove from heat and rest for 5 minutes.
- Garnish with sesame seeds, sliced green onions, and optional red pepper flakes. Serve immediately.

📅 Last Updated
Updated on 2026-06-18 to reflect the latest test-kitchen insights.
🔍 Testing Methodology
Every recipe is developed and tested at least three times in our home kitchen using standard US measuring cups and spoons.
📖 Recipe Source Notes
Inspired by traditional family methods and refined through professional culinary testing.
⚠️ Nutrition Disclaimer
Nutrition is estimated from an ingredient database. Actual values vary with brands and preparation.