No Bake Peanut Butter Bar Recipe
The ultimate guide to making the perfect no bake peanut butter bar at home.
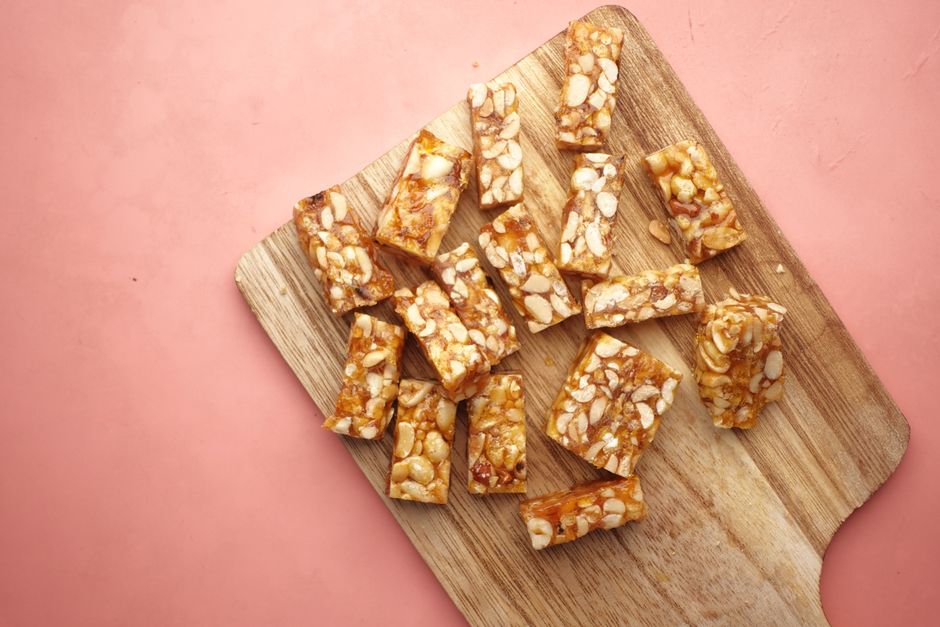
No bake peanut butter bars are a quick and easy dessert that requires no oven time. Simply mix peanut butter, oats, and honey, press into a pan, and chill until firm. They’re perfect for a sweet treat without the hassle of baking.
No bake peanut butter bars are a classic treat that combines the rich, creamy flavor of peanut butter with the satisfying crunch of oats. These bars are incredibly easy to make and require no baking, making them a perfect choice for hot days when you don’t want to turn on the oven. With just a few simple ingredients, you can create a delicious snack or dessert that the whole family will love.
Whether you’re looking for a quick after-school snack, a post-workout energy boost, or a sweet treat to satisfy your sweet tooth, these no bake peanut butter bars are the answer. They’re customizable, too — add chocolate chips, dried fruit, or nuts to make them your own. Follow this foolproof recipe for the best no bake peanut butter bars you’ve ever tasted.
Pros
- No oven required — perfect for hot weather
- Ready in under 30 minutes
- Simple ingredients you likely already have
- Kid-friendly and great for lunchboxes
- Customizable with add-ins like chocolate chips or nuts
- High in protein and fiber
Cons
- Can be high in calories if overeaten
- May not hold shape if not chilled long enough
- Not suitable for those with peanut allergies
✅ This recipe was last tested and validated by our test kitchen on 2026-06-13.
Key Takeaways
- Use creamy peanut butter for the smoothest texture.
- Chill the bars for at least 2 hours before cutting.
- Line your pan with parchment paper for easy removal.
- Old-fashioned oats work best for the right chew.
- Store in the refrigerator to keep bars firm.
- Add a chocolate drizzle for an extra indulgent touch.
Ingredients
To make this authentic no bake peanut butter bar you will need the following fresh ingredients:
Everything you need for no bake peanut butter bar
🛒 Shop Key Ingredients
| Ingredient | Why You Need It | Buy |
|---|---|---|
| Creamy Peanut Butter | Provides the rich, smooth base flavor for the bars. | Check Price |
| Old-Fashioned Oats | Adds texture and helps bind the bars together. | Check Price |
| Honey | Natural sweetener that helps hold the bars together. | Check Price |
| Chocolate Chips | Adds a delicious chocolate layer on top. | Check Price |
Kitchen Equipment
| Tool | Why You Need It | Buy |
|---|---|---|
| 8×8 Baking Pan | For pressing and shaping the bars. | Check Price |
| Parchment Paper | Lines the pan for easy removal of bars. | Check Price |
| Mixing Bowl | For combining all ingredients. | Check Price |
| Spatula | For pressing the mixture into the pan. | Check Price |
Step-by-Step Instructions
Follow these steps exactly for perfect no bake peanut butter bar every time.
Preparation
Line an 8×8 baking pan with parchment paper, leaving some overhang on the sides for easy removal later.
In a large mixing bowl, combine the peanut butter, honey, melted coconut oil, vanilla extract, and salt. Stir until smooth and well combined.
Fold in the old-fashioned oats until everything is evenly coated and the mixture is thick and sticky.
Transfer the mixture to the prepared pan. Use a spatula or your hands to press it down firmly and evenly into the pan.
Sprinkle the chocolate chips and chopped peanuts (if using) over the top. Press them gently into the surface.
Refrigerate for at least 2 hours, or until the bars are firm and set.
Lift the bars out of the pan using the parchment paper overhang. Cut into squares or rectangles and serve.
Cooking
This recipe is completely no-bake! Simply mix, press, and chill for delicious peanut butter bars.
Chef’s Secrets
- Use natural peanut butter: It gives a more authentic flavor, but make sure it’s well-stirred so the oil is fully incorporated.
- Don’t skip the salt: A pinch of salt enhances the peanut butter flavor and balances the sweetness.
- Press firmly: The harder you press the mixture into the pan, the better the bars will hold together.
- Chill thoroughly: At least 2 hours in the fridge ensures clean cuts and firm bars.
- Customize freely: Add dried cranberries, shredded coconut, or a drizzle of melted chocolate for variety.
Storage
Store no bake peanut butter bars in an airtight container in the refrigerator for up to one week. Place parchment paper between layers to prevent sticking. These bars taste best when chilled and will soften at room temperature.
Freezing
To freeze, wrap individual bars tightly in plastic wrap and place them in a freezer-safe bag or container. They will keep for up to 3 months. Thaw in the refrigerator overnight or at room temperature for 30 minutes before serving.
Reheating
Since these bars are no-bake, they don’t need reheating. However, if you prefer a softer texture, let them sit at room temperature for 10-15 minutes before serving. For a warm treat, microwave individual bars for 10-15 seconds — the chocolate will get slightly melty and delicious.
Variations
- Spicy: Add a pinch of cayenne pepper and a dash of chili flakes to the peanut butter mixture for a sweet-and-spicy kick.
- Creamy: Use all peanut butter and reduce the oats by half for a fudgy, truffle-like texture.
- Vegan: Substitute honey with maple syrup and use dairy-free chocolate chips to make these bars fully vegan.
- High-Protein: Stir in a scoop of vanilla protein powder and use PB2 peanut butter powder for an extra protein boost.
Substitutions
If you don’t have honey, you can use maple syrup or agave nectar as a 1:1 substitute. Almond butter or sunflower seed butter can replace peanut butter for a different flavor or to accommodate allergies. Quick oats can be used instead of old-fashioned oats, though the texture will be slightly less chewy. Coconut oil can be replaced with butter or ghee if preferred.
Common Mistakes
The most common mistake is not chilling the bars long enough — cutting them too early will result in crumbly, messy pieces. Another mistake is not pressing the mixture firmly enough into the pan, which leads to bars that fall apart. Using crunchy peanut butter instead of creamy can also affect the smooth texture. Finally, skipping the parchment paper makes removal from the pan nearly impossible.
Serving Suggestions
Serve no bake peanut butter bars as a snack, dessert, or even a quick breakfast on the go. They pair wonderfully with a glass of cold milk, a cup of coffee, or a scoop of vanilla ice cream. For a party platter, arrange them on a board with fresh fruit, nuts, and other no-bake treats. They’re also perfect for lunchboxes and after-school snacks.
Nutrition Facts
| Nutrient | Per Serving |
|---|---|
| Calories | 280 calories |
| Protein | 9g |
| Carbohydrates | 30g |
| Fat | 14g |
Frequently Asked Questions
Can I use crunchy peanut butter instead of creamy?
How long do no bake peanut butter bars last?
Can I make these bars without honey?
Why are my bars crumbly?
Are no bake peanut butter bars healthy?
🍽️ You Might Also Like
Culinary Glossary
No Bake Peanut Butter Bar Recipe
Ingredients
- 1 cup creamy peanut butter
- 1/2 cup honey
- 1/4 cup coconut oil, melted
- 2 cups old-fashioned oats
- 1/2 cup chocolate chips
- 1/4 cup chopped peanuts (optional)
- 1 tsp vanilla extract
- Pinch of salt
Instructions
- Line an 8×8 baking pan with parchment paper.
- Mix peanut butter, honey, coconut oil, vanilla, and salt until smooth.
- Fold in oats until well combined.
- Press mixture firmly into the prepared pan.
- Top with chocolate chips and chopped peanuts.
- Refrigerate for at least 2 hours until firm.
- Cut into bars and serve.

📅 Last Updated
Updated on 2026-06-13 to reflect the latest test-kitchen insights.
🔍 Testing Methodology
Every recipe is developed and tested at least three times in our home kitchen using standard US measuring cups and spoons.
📖 Recipe Source Notes
Inspired by traditional family methods and refined through professional culinary testing.
⚠️ Nutrition Disclaimer
Nutrition is estimated from an ingredient database. Actual values vary with brands and preparation.